This lesson will be the last introductory lesson (lesson practices) before we begin the actual game creation.
This lesson is simple and quick, but it introduces cascades, which are commonly used in Smalltalk code. Understanding and becoming familiar with them will help you utilize them effectively, as well as recognize them when you encounter other Smalltalk code. By using cascades, you can reduce code clutter and minimize the amount of typing needed.
The following code is an example from Lesson 3. This code completes messages by using a period which in Smalltalk is the statement separator. Placing a period between two expressions turns them into independent statements.
Even though the code looks simpler, it is important to understand what is happening. When the same object is the receiver of a sequence of consecutive messages, you do not need to repeat it. You can remove the repeated receiving object and replace the ending period with a semicolon (;). So, the basic rules for cascades are:
Cascaded expressions are separated by semicolons
All cascaded messages share the same receiver as the last message executed before the first semicolon
So, if it is as simple as replacing periods with semicolons, why does this lesson’s example not work if a semicolon were placed after “SimpleButtonMorph new”?
SimpleButtonMorph is a class, not an instance of that class. This means that you cannot send instance messages directly to the class itself. A class can receive class messages, but in this example, we are sending instance messages, which can only be sent to instances of the class, not the class itself. Therefore, to interact with the instance, you must first create an instance by sending the message “new” to SimpleButtonMorph. It is this instance of SimpleButtonMorph that can receive instance messages. In other words, all the cascaded messages are sent to the object created by “SimpleButtonMorph new”, demonstrating how a sequence of cascaded messages can be sent to the result of an expression.
In conclusion, understanding and using cascades in Smalltalk can greatly simplify your code, making it more readable and reducing redundancy. By chaining multiple messages to the same object in a single expression, you can streamline your code and focus on the logic rather than repetitive syntax. With this knowledge, you can write more efficient, elegant Smalltalk code and recognize cascading patterns in other code you encounter.
For Lesson 4 and the complete series of lessons on creating the Shooter Game, including all the necessary resources such as PDFs, source code, images, sound file, and more, visit https://scottgibson.site/ShooterGame/. This site not only provides everything you need to progress but also allows you to play the game directly in your browser using SqueakJS. Whether you are just getting started with Squeak/Smalltalk or advancing your skills, these resources will help guide you as you move forward through the game development process.
In this lesson, we will learn about blocks in Smalltalk. A block is a small piece of code that can be treated as an object. It is often used to perform actions or calculations when needed. Blocks are written inside square brackets, and they can be passed around or executed by other parts of the program. While blocks are commonly used in programs to make things happen, for now, think of them as a way to understand how code can be organized and applied. This lesson is a simple introduction to blocks, so you do not need to fully understand everything about them yet. By the end of the lesson, you will have a better idea of what blocks are and how they work in code. You will also learn how to use blocks to interact with your EllipseMorph.
We will also use a simple button morph to interact with our EllipseMorph. By clicking the button, you will be able to make the EllipseMorph move. This lesson will show you how to create a simple graphical button that can then be used to interact with your morph. This is a nice way of interacting with the morph without having to do much coding for now. It allows you to focus on understanding the basic concepts before diving into more complex programming. As you progress, you will learn how to build more advanced interactions and customize the behavior of your morphs.
Additional Resources
For additional learning, there are several resources that can help you dive deeper into the topics we covered. You can start by exploring the Block Swiki page here to get a better understanding of how blocks work in Smalltalk. If you want to learn more specifically about the BlockClosure class, check out a detailed explanation here, also a Swiki article. Another helpful resource is the Terse Guide to Squeakonline, which is always available within the Squeak image under Help -> Terse Guide to Squeak. Lastly, the Squeak by Example book is an excellent resource for exploring Squeak and Smalltalk in more detail, and you can read it here. These resources will provide you with more in-depth information and examples to support your learning.
For the complete series of lessons on creating the Shooter Game, including all the necessary resources like PDFs, source code, images, sound files, and more, visit https://scottgibson.site/ShooterGame/. This site not only offers everything you need to progress but also lets you play the game directly in your browser using SqueakJS. Whether you are just getting started with Squeak/Smalltalk or are advancing your skills, these resources will help guide you as you progress through the game development process.
In this lesson, we will focus on making Morphs move, an essential step in creating interactive and engaging gameplay. You will learn how to send messages to Morph objects, enabling them to change their position on the screen. Movement is a key part of any game, whether it involves your ship, enemies, or projectiles. By the end of this lesson, you will understand different ways to move Morphs relative to a specific location, giving you basic control over their movement in your game.
To begin, it is important to understand how Morph movement is accomplished in Squeak, a version of Smalltalk, as not all Smalltalk implementations support Morphs, which is what we are using here. Squeak is an object-oriented language, meaning everything is an object. Objects can communicate with each other by sending messages, which is how actions and information are requested in Squeak. Much like how people communicate by sending messages to one another, objects in Squeak send messages to request actions or receive information, or both.
Understanding Messages in Smalltalk
In Smalltalk, there are three types of messages: unary, binary, and keyword. Unary messages have the highest precedence, followed by binary messages, and then keyword messages. These different types of messages help objects interact in various ways.
Unary messages are messages that are sent to an object without arguments.
Binary messages consist of special characters like +, -, or @, and each one takes exactly one argument to perform an action or computation involving two objects.
Keyword messages consist of one or more keywords, each ending with a colon (:), and each keyword takes an argument.
The Difference Between position: and position
In this lesson, you will focus on understanding how to use the position messages. The first important thing to know is the difference between two messages that seem similar but actually work in different ways: position and position:. They both deal with the position of Morphs, but they are used differently.
The message position, without a colon, is a unary message. It does not require any arguments and simply retrieves the current position of the Morph.
The message position:, with a colon at the end, is a keyword message. It can receive a value or an argument, which is used to change the position of the Morph.
This difference in how the messages are structured is important because it tells Squeak how to process them. The position message simply retrieves the current location of the Morph, while the position: message accepts an argument to set or change the Morph’s location.
Understanding How to Control Morph Movement
By understanding how messages work in Squeak, you can effectively control the movement of Morphs. Each message, whether unary, binary, or keyword, enables you to send specific instructions to objects, helping them change their state or position on the screen. This knowledge of messages forms the basis of interacting with objects in your game.
As you progress through the lesson, you will learn how to send different types of messages to Morphs, allowing you to interact with them in various ways. This skill will be crucial for making your game dynamic and interactive, enabling you to work with Morphs to create engaging gameplay elements.
By the end of this lesson, you will have a good foundation in how messages are used to control movement in Squeak, and you will be ready to apply this knowledge in your game.
Final Notes
Please remember to save your Squeak image after each lesson. This way, if you ever encounter a problem with your code, you can always close the image and reopen it from where you last saved it. It would be helpful to save your Squeak image after you have successfully completed each lesson, so you can always reopen the image from the last completed lesson in case something unexpected happens while proceeding through the current lesson.
Note that the extra parentheses in this lesson are not necessary, but they may help new learners visualize the objects conceptually, especially at the start. The syntax is still correct and can be adjusted later, so nothing harmful is being introduced. At this point, it seemed better to provide a visual, conceptual understanding through the code, rather than focusing solely on minimizing syntax. Future lesson code will not include these.
Lesson Resources
For the complete series of lessons on creating the Shooter Game, including all the necessary resources like PDFs, source code, images, sound files, and more, visit https://scottgibson.site/ShooterGame/. This site not only offers everything you need to progress but also lets you play the game directly in your browser using SqueakJS. Whether you are just getting started with Squeak/Smalltalk or are advancing your skills, these resources will guide you through each step of the game development process, helping you apply the techniques you learned in this lesson, such as moving Morphs and controlling game objects.
The holidays may be over, but the presents are still arriving from the UK Smalltalk User Group! Videos of previous presentations have been released over the past month, covering a variety of interesting topics–a total of 57 as of this writing! Be sure to check out their new YouTube channel at https://www.youtube.com/@UKSTUG. Also, be sure to visit their homepage at https://www.uksmalltalk.org/, and if you would like to attend any meetings, their Meetup site can be found at https://www.meetup.com/ukstug/.
Have a great time with Smalltalk and keep on Squeaking!
This article kicks off a series designed to introduce programming to beginners through the creation of a simplified space shooter game using Squeak, an open-source implementation of the Smalltalk programming language. By breaking down the process into a series of manageable lessons, the aim is to provide an accessible and interactive entry point into the world of programming. This series will guide learners through the process of building a game from the ground up while introducing them to essential programming concepts along the way. Upon completion, and with the accompanying resources such as source code, images, and a sound file, students will have everything they need to recreate or enhance the game.
Who This Series is For
The intended audience for this article and the accompanying series includes both young learners and adults who are new to coding or to Smalltalk. Whether you are a student, educator, or hobbyist, these lessons are tailored to make programming approachable and enjoyable. Throughout the series, we will dive into key programming principles – such as object-oriented design, the concept of “Morphs” in Squeak, and more – at a beginner-friendly pace. Each lesson is supplemented with practical examples. If you are interested in starting with something fun and educational, and you are curious about how games are made or how Smalltalk can be used in a modern development environment, this series is for you.
Why a Game, and Why Squeak/Smalltalk?
So why a game, and why in Squeak/Smalltalk? Why not? Everybody understands the domain of games, or gaming. That is, the mechanics, interactions, and goals – such as managing player input, controlling game characters, defining win/loss conditions, and creating interactive environments. Games are a universal medium that spans across ages and cultures, from simple board games to complex video games. This familiarity makes games an excellent starting point for teaching programming concepts, as the mechanics and goals are intuitive to most people. Moreover, games require a variety of programming elements to function, such as managing user input, handling graphics, implementing game rules, designing levels, and even creating sound and music. These components provide a rich environment for introducing and practicing key programming skills – like decision-making, loops, object-oriented design, and event handling – while keeping learners engaged with a fun, practical outcome.
Why Squeak/Smalltalk is the Right Tool
Squeak makes all of this very easy, and you do not need to learn anything more than Smalltalk to get started. The language is intuitive and enjoyable to use, and Squeak provides a powerful and engaging development environment. While games may not balance your bank account, they can serve as an excellent resource for learning programming or a new language. Squeak/Smalltalk, in particular, makes this process both accessible and enjoyable.
How This Series Came to Be
This article introduces a series of lessons based on a simplified version of a space shooter game I developed using Squeak. The project, which was both fun to create and my first full Squeak program, turned out to be an ideal way to teach my middle school-aged son Smalltalk, as well as the fundamentals of object-oriented programming (OOP). Although he had prior programming experience, he quickly grasped the language due to its simplicity and the interactive nature of the environment. The natural syntax of Smalltalk, combined with the user-friendly environment, not only made it easier for him to solve problems but also allowed him to be more creative, without needing to alter his natural problem-solving approach. Both the language and the environment “got out of his way,” enabling him to express himself more easily and effectively.
What Will Be Covered in the Series
The lessons in this series are designed to introduce key programming concepts – such as classes, methods, debugging, and user interface design – through the process of building and modifying a game. You can find the complete list of lessons on the Shooter Game site. Each lesson was written daily, and I discussed topics both before and during the lesson to provide additional detail and ensure a deeper understanding. This approach allowed me to offer relevant explanations exactly when they were needed, based on my son’s progress and evolving needs.
For each article, I will aim to provide additional helpful information that may not be included in the lessons themselves. If you feel any details are missing or could be useful, please let me know, and I would be happy to provide further information.
Interactive, Live Coding Approach
The hands-on, live coding approach in these lessons encourages learners to experiment and learn in real time, making the process both educational and enjoyable. Each lesson also comes with a downloadable PDF version of the lesson page for easy offline reference or printing. The entire series progressively builds upon itself, allowing learners to gradually develop their programming skills as they move through the lessons.
Lesson 1: Creating and Positioning Morphs
For today’s lesson, we will dive into the first step in building our game: “Creating and Positioning Morphs.” In this lesson, we will introduce the concept of a Morph and explore how to create and manipulate these visual objects within the Squeak environment. Understanding Morphs is a crucial part of game development in Squeak, as they serve as the foundation for all the interactive elements of the game.
What is a Morph?
In Squeak, a Morph is an interactive graphical object. Like everything in Smalltalk, a Morph can be interacted with through messages. It is not a static, lifeless image on the screen, but rather a lively object waiting to interact with its environment. You can send a message to a Morph to receive information about it or to perform an operation. Everything you see when running Squeak is a Morph object. This presents some very exciting capabilities, as it provides you with the ability to create graphical objects, which can interact with the world (the entire Squeak environment – its display screen in this case) and the world can interact with them.
The Squeak world works using a coordinate system. The coordinate values can be absolute or relative. Each coordinate value is represented as a point, which has an X coordinate and a Y coordinate. For example, a Squeak world (remember, this will be the full size of the display screen in the Squeak environment) with a display size of 1024×768:
The point 0@0 is the top-left corner of the screen.
The point 0@768 is the lower-left corner of the screen.
The point 1024@768 is the lower-right corner of the screen.
The point 1024@0 is the top-right corner of the screen.
Every point in between represents a location within the world. Points can exist outside of that world too; however, they would not be visible.
In this game, everything is a subclass of Morph, so you will be using Morphs a lot.
Before beginning Lesson 1, it would be very helpful to read Chapter 1 of the Squeak By Example book (available as a free PDF, SBE-6.0.pdf), an excellent resource for learning Squeak and understanding its environment. Afterward, you can go straight to the lesson here.
Additional Resources
To access the full series of lessons and resources for the space shooter game, Shooter Game, visit the lesson site at https://scottgibson.site/ShooterGame/. There, you will find the complete set of lessons and their associated PDFs, along with the source code, images, the sound file, and other useful resources. You can even play the game directly in your browser (using the awesome SqueakJS!). Whether you are a beginner or looking to learn more about Squeak/Smalltalk, its environment, and its tools, these resources will guide you through each step and provide everything you need to recreate or enhance the game.
Roguerrants is a game engine for interrupted real-time 2.5D (parallaxed top-down) roguelike games, developed by Stéphane Rollandin, and is written in Squeak/Smalltalk. Stéphane announced on the Squeak developers list (here) the availability of Roguerrants on itch.io.
A “Roguelike” game is a sub-genre of RPGs, named after the classic 1980 game “Rogue.” It is defined by features such as dungeon crawling through procedurally generated levels, turn-based gameplay, grid-based movement, and the permanent death of the player character. Roguelikes have evolved over time, inspiring numerous variations and modern interpretations, often referred to as “roguelites,” which may incorporate elements like permanent upgrades or less punishing death mechanics.
The Weekly Squeak reached out to Stéphane Rollandin, who generously shared details about the development of Roguerrants.
What led you to use Squeak to develop a game? How is Roguerrants different from something you would have created using another programming language?
I have been working with Squeak for the last twenty years. I could just not work with anything else. I’ve been spoiled.
I first came to Squeak to port GeoMaestro, a system for musical composition based on geometrical structures that I made in the KeyKit MIDI environment. In KeyKit there are classes and I first met object-oriented programming there.
Someone from the csound-dev list I think told me Squeak would be a good fit for me, and this is the best piece of advice I have ever been given.
So I first used Squeak for music. GeoMaestro became muO, which is a huge system that eventually allowed me to compose my own pieces, although I have no musical education and no playing talent whatsoever.
In muO I did a lot of graphical stuff, and notably a family of interactive editors that evolved into the ones I use for Roguerrants maps and geometrical structures (navigation meshes for example).
muO taught me Morphic, which I believe is an incredibly underestimated pearl. It’s a beautiful framework. It’s amazing. I know a lot of people in the Squeak community (and even more in the Pharo one) think of it as a pile of cruft that needs to be reconsidered completely, but to me it’s just a wonderful framework.
Roguerrants is 100% a Morphic application. Without Morphic, I could not have done it at all. And without the tools I made for muO, I would not have considered building a system that ambitious.
Regarding graphics and sound, how do you implement these elements in Squeak? What advantages does the environment offer?
So, graphics are pure Morphic and BitBlt. I just tweaked a few things to make them faster, and made a few fixes. I had a hard time with composition of alpha channels, notably.
The advantages of Morphic is the natural division of tasks, where each morph draws itself. Graphics are naturally structured; more about this below.
Sound is also supported natively in Squeak. In muO I did mostly MIDI, and some Csound, but also a little audio synthesis so I known the sound framework quite well. I fixed a couple bugs there too. And I made editors for sound waves and spectra.
In Roguerrants, each monster class uses its own synthesizer and actually plays musical notes. Its utterances are composed with muO. I can generate adaptive music, although this is still in an early stage.
The concept of free motion and an organic grid is intriguing. What motivated you to incorporate these elements in Roguerrants, and did you encounter any challenges during their implementation?
I like things to be free from grids, in general. But grids are useful, so the main point is to be able to treat them as a game component just like another instead of having them being the paradigm everything happens within.
In Roguerrants everything happens in real-time and is located via the plain morphic coordinates system. That’s the base. The grid comes second. The turn-based structuration of time also comes second. In fact, the whole of Roguerrants comes second to Morphic itself. The game playground is just a single morph. The time evolution is the Morphic stepping system, no more, no less.
Organic grids are relaxed Voronoi tesselations that take into account the surrounding of the controlled character. The challenge there is make them seem natural to the player.
For example, the grid should not feature cells at places the player do not see (because it may give the player hints about what’s there) but this is a subtle issue, because some of these places have been seen recently, so why no allow access?
There are also different ways the grid adapts to what the player does.
For example, not all cells in the grid are reached at the same speed. If the player makes a small move, it will also be a slow move. This is to prevent the player from abusing the turn-based system by being too cautious. On the other hand, a long move is faster: the player is running. This makes sense if you remember that once the move is chosen, it cannot be interrupted; if a source of danger is encountered during a move, too bad.
How does the grid adapt to that? Well, the base navigation grid is generated within a specific radius around the player. If the player runs close to its border, the grid for the next turn will have a smaller radius: the player will not be able to run twice in a row. One turn is needed for resting somehow. This creates a nice ebb and flow in dangerous situations.
Another example: when the player character is stunned, its navigation grid has larger cells. The stunned condition has several effects, and one of them is to make the player more clumsy in the way it moves.
So a lot can go on when one thinks of what it means to be provided a navigation grid generated differently for each turn. I am still exploring what can be done there, and as I said the challenge is to make all the mechanics invisible to the player, yet there in an intuitively meaningful way.
Generating graphics without a tile-based system is a unique challenge. How did you tackle this issue in Roguerrants?
Let’s see this from the point of view of Morphic, again. A morph can have any shape and size. You just put it on the World, and that’s it. It can draw itself, so it handles its own part of the overall display.
So in that sense it is not a challenge at all, just the morphic way.
Now there is a little more to it.
As I said above, the game playground is a morph (a subclass of PasteUpMorph, the class of the World). It has a very specific way to draw itself, unique in the world of morphs. For one thing it draws it submorphs layers by layers, allowing the 2.5D parallaxed display, and also it allows any of its submorphs to paint anywhere.
So in addition to drawing itself, a morph in Roguerrants can decorate part of all of the game world in its own way. That’s how the ground is displayed for example.
High-level components like activities and missions can significantly affect gameplay. How do these elements drive character behavior in Roguerrants, and what distinguishes your approach?
This is one of the most involved technical points.
First there is ModularAgency. This is a design for giving any object an arbitrary complexity, in a dynamic way. I do not have the room to discuss this further here, but there is a lot to say; it is the core design of Roguerrants, and definitely one of the things I am the most proud of. It is a kind of ECS (entity component system), but a very unique one.
Via its #agency, a SpriteWithAgency (the subclass of Morph that all game actors are #kindOf:) has a dynamic library of components, each attributed a specific responsibility. There is really a lot of them. At the time of writing, there are 165 implementors of #nominalResponsibility, which means there is that number of different, well identified, aspects of the game that have a dedicated component. A NPC has around 25 to 30 components.
Among them are the ones responsible for its #activity and #mission.
The #activity component directly drives the #deepLoop component, which is the one that handles the #step method of a Sprite.
For example, if the #activity of a goblin is a journey, it will ultimately add to the goblin #deepLoop, at each morphic step, a command for changing its position and its orientation.
Now this is just the end point of a complex computation, because to do so it needs to know where to go, and so it consults the goblin #destination component, it asks the game #cartographer to produce a navigation mesh and do some A* magic there [ed. A* is popular algorithm used to find the shortest path from a starting point to a goal point on a graph or grid], it asks its #collisionEngine if there is any obstacle in the way, and if there is one that hinders the journey it delegates the problem to the #journeyMonitor component. You get the idea.
But the journey may need to be interrupted, or even discarded entirely. An activity is a moment-by-moment thing, it does not have a broad scope in terms of the overall behavior of the agent.
When an activity signals that its job is done, the #mission component gives the agent another activity. It is the #mission that implements what the agent behavior is about. Two agents can have a similar activity, like going from point A to point B, but very different missions: one can be heading to a chest to fetch something, while the other one is actively hunting the hero. Their activities at a given time are what their respective missions told them to do; they will be given very different activities after they arrive at their destinations.
When a mission is accomplished, the #mission component removes itself, and in the process it installs a specific kind of activity, an idle activity. The idle activity gives the agent a new mission.
So there is an interplay between mission and activities. Both components taken together make an agent do something in a well-defined context.
Then there are quests. Quests are components that give an agent a set of goals. They push the narrative forward. They can give missions. At the level of quests, we deal with the “why?” of an actor behavior. That’s the level of the story, of the game scenario.
Implementing original systems often comes with its own set of difficulties. What challenges did you face while creating your geometry- based combat and magic systems, alongside a high-level architecture for actor behaviors?
It’s not exactly a challenge, but computational geometry is tricky and it takes some time to get it right. Roguerrants uses convex polygons a lot, so I had to implement all related algorithms. The most complex one was Fortune’s algorithm for Voronoi partition. It took a lot of revisiting to make it stable and understand its domain of usability.
So why polygons?
In roguelikes, combat happens upon collision: you move your character towards a monster, there is an exchange of damage according to your stats and the monster stats, and life points are lost.
Collisions in a grid system is based on the grid connectivity: you collide with neighbor grid cells.
When moving freely, with an arbitrary shape, collision is more a geometry test: are polygons intersecting? So at this point, it made sense to me to have weapons, armor and hurt boxes also collide, individually.
When a character yields a sword, that sword attaches an impacter to the agent. The impacter is a polygon convering the area where the sword deals damage.
A creature has one or more hurt boxes (also polygons). If a weapon impacter overlaps one of these boxes, damage is dealt. And then, the impacter enters a cooldown period during which it becomes inactive. Armor works similarly.
The magic system uses geometry in another way.
Let’s take for example the Ring of Blinking. When equipped, the player character can teleport itself to a nearby location. What are its choices? It could be a grid, like the one used for navigation. But blinking is a powerful ability, so it’s better to give it some limits, and even make it dangerous – that’s much more fun. We can do that with geometry.
The places the player can blink into are a set of polygonal areas arranged in a mandala. When the blinking ability is not in cooldown, these places are small. Each time blinking is used, they grow. As time passes, they tend to get smaller again. If the player blinks too often, its mandala will feature very large regions. Blinking into a region only guarantees that you will land inside, not where. And so the more often you blink, the more you risk to teleport at a bad place, possibly even inside a wall or a rock (and then you die horribly).
Different abilities have different mandalas and different uses of their polygons. The exact mandala you get also depends on where you are, because magic is also a negociation between an actor and its surroundings. Some places forbid, enhance or degrade magic. This dimension of the game will be expanded a lot in the future, because it informs its tactical aspects.
The inclusion of biomes as first-class objects is a compelling design choice. How does this decision enhance the logic and functionality of your game?
This is a natural consequence of the way spatial partition is implemented.
Game maps in Roguerrants can be limited, or unlimited. Even when limited, they may be large. For this reason, they usually are not completely spawned. Parts of a map are suspended, waiting to be populated and made alive when the player, or another important actor of the game, approaches them. When they are not useful anymore, they get suspended again.
This means maps are modular. There is usually a top tesselation of large convex polygons, which may be hexagonal. Often each polygon is itself subdivided in regions, and this goes on down to the desired granularity.
At each region or subregion is associated a modular agency, called a local power. Local powers have many components, notably the component responsible for spawning and despawing game objects living in the corresponding region.
Local powers are very important. They are actors, invisible to the player, that inform a lot of what happen in the game, anything actually that is related to location. It is dark there? Who lives there? What is the nature of this place? Etc.
And so it makes sense that for a biome to be a component of a local power. Imagine a forest surrounded by fields, a forest that get denser at its core. Let’s say the whole map is an hexagonal tesselation. We give a biome to the hexagonal cells for fields, and another biome for the forest cells, plus yet another biome, probably a child of the former one, for the forest core. We then ask each cell to generate trees – that’s one line of code. The component(s) responsible for spawning trees is looked-up via the biomes. Fields will not generate trees, forest cells will generate them, and dense forest cells will generate a lot of them. Rocks will be different in fields and forest, etc. The different creatures that appears in the game will also be looked up via the biomes – snakes in the fields, giant spiders in the core forest, etc.
How did your design philosophy for Roguerrants shape the features you chose to implement in the game?
The design philosophy can be summarized in a few principles:
Each notion, each concept, each dimension identified as orthogonal to the others in the game design must be reified into an object (often a component) responsible for its implementation
It should always be possible to go deeper in said implementation.
It is nice to preserve the variety of ways it can be implemented.
For example, collision. What objects in the environment should we consider as potential obstacles? How do we test for actual collision?
The answer is to not look for The One Way To Collide, but instead to provide the tools (including the conceptual ones) allowing to express the problem effectively, and then use them to build the different answers adapted to different contexts.
So for example, a large group of gnomes, of an army of goblins, will bypass a lot of collision tests, so that they do not lock themselves into some ugly traffic jam. They will interpenetrate a bit.
A projectile, which is fast and small, will not test its collision in the same way as a big and slow monster. The projectile will consider itself as sweeping along a line and look at the intersection of that line with surrounding objects. The monster will look for the intersection of unswept polygons. Also the projectile has a target, of which it is aware, so it will take special care of it.
When riding a monster, a goblin will delegate the collision responsibility to the monster. No need to do anything, it’s just the rider.
A character moving along a path computed from a navigation mesh do not need to test for collision against walls – the mesh already took them into account.
But a character driven in real-time, via the mouse, by the player, do need to consider walls. It has a different #collisionEngine component.
Now if this mouse-driven character is blocked, lets says when attempting to move between two trees, it is maybe because the path is narrow and the player did not find it (sometimes this is a matter of pixels). At this point the collision engine interacts with the #cartographer (the component responsible for computing navigation meshes) and checks if indeed a path exists. If it does, it follows that path and succeeds in moving between the trees. The player did not notice anything. Computer-assisted driving! That’s point 2 above: it is always possible to go deeper in the implementation.
So when implementing a new feature, the first task is to express what I want to do in terms of the notions already reified in the game engine. If a new notion is introduced by the new feature, I create the corresponding components, maybe refactoring and refining the existing ones.
Then I come up with a lousy implementation of the feature, and live with it for a while. When I’m fed up with the ways it does not work well, I go deeper, I do it better. I am constantly revisiting existing features and the way all components interact together, which is only possible because refactoring in Smalltalk is so painless and easy.
Looking ahead, what enhancements or new features do you envision for Roguerrants?
First of all, I want to expose all the features that are already there. That’s why I released two projects on itch.io:
One is Roguerrants, the game engine.
The other one is a game. It is called, tongue in cheek, The Tavern of Adventures, and at the moment it is very primitive. I intend to grow it into something fun that will illustrate a lot of systems that are hidden in the engine at the moment. For example, you can fly. You can also control a party. You can play board games. There are rivers and lakes, lava pools, bottomless pits, basilics, dolmen, villages… You can trade and exchange intel with NPCs. You can have procedurally generated, evolving scenarios. Victory conditions that are not known in advance.
Then, for the future, I can see two main features coming for the game engine.
One is adaptive music. I would like the game to generate its own music. This is a long-term goal, and where I will go back full muO.
The second is a declarative API. A very simple format, even usable by non-programmers, to create custom games. I have already begun this, and the little I implemented already gives me a huge boost in the speed of game contents generation.
Player experience is a crucial aspect of game design. What do you hope players take away from Roguerrants, and how do you see their experience evolving as you continue to develop the game?
Well at the moment I do not have a game for them. I only have a game engine. I first need to upgrade Tavern of Adventures to a proper gaming experience, with tactical situations, exploration, meaningful decisions and a bit of strategizing. We’ll see how it goes.
Try It Out!
If you are interested in exploring the capabilities of Roguerrants and experimenting with its features, you can find more information about the project on its official itch.io page here. Stéphane also mentioned The Tavern of Adventures, which can be found here. Additionally, do not forget to check out the muO project (here), which focuses on musical objects for Squeak, offering a unique dimension to your creative explorations. We encourage you to dive into these exciting projects and do not miss the opportunity to explore the innovative possibilities they offer!
Have a great time with Smalltalk and keep on Squeaking!
On the Squeak developers mailing list, Lauren Pullen shared her experience (found here) using Squeak while working on a rendering engine for a first-person maze game, similar to the technique used to render the original Wolfenstein 3D game. Wolfenstein 3D used a rendering technique known as ray casting. Her project captured our attention prompting us to seek additional information from her about it.
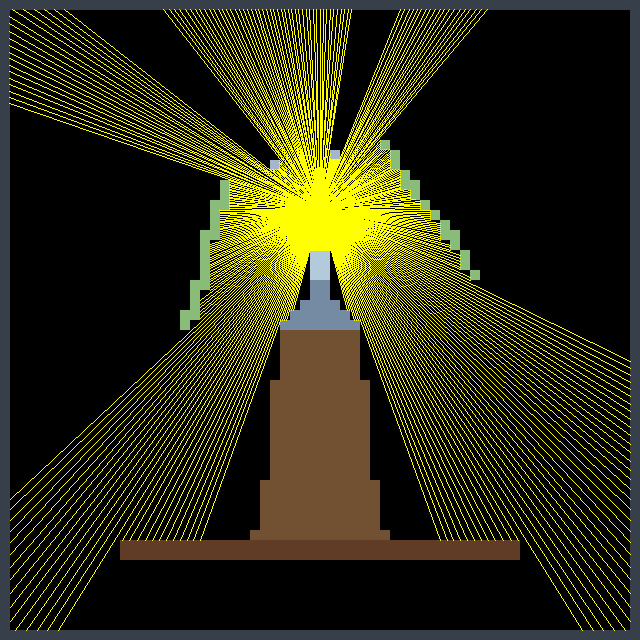
What is Ray Casting?
Ray casting is an early rendering technique used in computer graphics and video games, particularly in 2.5D and 3D environments. It is a simplified form of ray tracing, where a ray is cast from the player’s or camera’s perspective into the environment, and the distance to the nearest object along that ray is calculated. This process is repeated for each column on the screen, creating a 3D representation of the 2D world. Ray casting was widely used in the early days of 3D gaming, particularly in games like Wolfenstein 3D (1992).
From Lisp to Squeak
Lauren, with her extensive experience in Common Lisp, initially chose it to create a GUI application. However, she faced significant challenges. The graphics library was unreliable, often failing to start, and the outdated documentation made it difficult to work with. She studied MVC while designing her application but struggled with basic functionality, such as displaying a simple window.
She decided to switch to Smalltalk, specifically Squeak, which had an immediate impact. The graphical elements worked seamlessly from the start, and although she missed some features from Common Lisp, like restarts and method combinations, Squeak provided a development environment that allowed her to focus on development without drastically changing her mental approach to problems.
Comparing Development Tools
For game development, she initially relied on a much earlier version of Game Maker Pro. When she explored Godot, she found its complexity overwhelming compared to Smalltalk. The disorganization in Godot’s tutorials made her question how to create a basic viable product efficiently. In contrast, though seemingly minimal, Squeak’s classes Form and UserInputEvent provided all that was needed.
Advantages of Squeak
In Squeak, she found it easy to work with graphical elements. Drawing interface components and importing graphics were straightforward, thanks to the source code access for built-in drawing functions. This simplicity was crucial for her development process. While working on the game, she realized that making changes and seeing immediate results was invaluable for debugging. Her experience with Forth taught her the value of functions that do one thing well, and Smalltalk’s debugging tools like Inspect-It and Debug-It further streamlined the process.
Challenges and Solutions
However, she encountered challenges. While most errors in Smalltalk were easy to handle—usually, closing the Debugger was all that was needed—some issues could freeze the image, making recovery a bit more manual than desired. She found herself needing to use the Recover Changes window to restore unsaved changes more often than she would have liked.
In terms of rendering, she faced performance limits with BitBlt when texturing the floor and ceiling. To overcome this, she turned to the AbstractGPU library, leveraging the graphics card for drawing. She continued to use the ray caster to determine what the player could see to speed up the game, but introduced edge pop-in, where objects on the screen edges would suddenly appear while turning the camera, because of differences between the ray caster’s projection and the GPU’s projection. Increasing the field of view used by the ray caster resolved this issue.
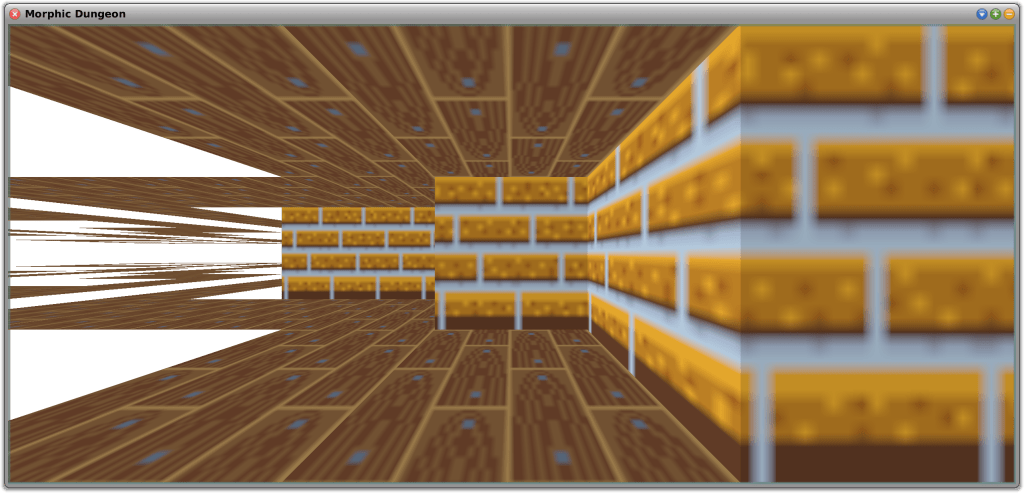
Testing Using Morphic Dungeon
Morphic Dungeon is what Lauren developed and uses to test the movement and texturing code. She wants to work with textures that are not symmetrical, which requires mapping the top-left corner of the texture to different positions on each face of the 3D objects. This approach also allowed her to test back-face culling—a technique that improves performance by not drawing faces of a 3D object that are not visible to the camera—in the GPU mode. In this mode, the “back faces” are flipped horizontally and appear further away, as if looking at the inside of a transparent painted box instead of the outside. Back-face culling will be essential for rendering the “walls” of tiles that the player can enter or see through, such as grass or support beams along the grid edges.
Lauren implemented three movement modes:
Free Movement and Free Turning
Grid-Locked Movement and Free Turning
Grid-Locked Movement and Grid-Locked Turning
Full Free Movement is similar to Wolfenstein 3D, allowing sub-pixel steps and small increment camera rotations.
Grid-Locked Movement is useful for first-person dungeon crawlers. Grid-Locked Turning forces camera rotation to 90-degree increments, similar to classic non-raycaster games like Wizardry or modern titles like Etrian Odyssey. Free camera rotation, with Grid-Locked Movement, is also supported which is similar to the modern title Operencia.
While using Morphic Dungeon to test the different movement modes, Lauren encountered an amusing floating point error whereby the player would step repeatedly through walls and out of the play area. This provided a humorous insight into the potential bugs she might encounter.
Additionally, Lauren tested the game with a family member, revealing that the 40×40 maze, though not difficult from an overhead view, proved challenging from a first-person perspective without an overhead view or compass. This feedback helped her adjust the difficulty of the first area to better suit new players.
Future Plans
Looking ahead, she plans to explore non-flat levels and dynamically stitching multiple maps together. This might result in overlaps while rendering, so the ray caster will be in charge of telling the graphics card what to draw. Meanwhile, she will focus on improving floor and ceiling loading performance, although this is currently less critical due to the few vertices involved.
Lauren believes that developing a game is a great way to introduce people to programming. While tools are useful, having something that you can play with is fun. Old tile-based games and raycasters are particularly appealing to her because they are simple to work with, even for beginners.
Overall, Lauren believes that Squeak has proven to be an excellent choice for her project, offering the simplicity and functionality needed for a successful game development experience.
Why Not Give It a Try?
If you would like to experiment with ray casting in Squeak, you can find out more about her project from SqueakSource here. To use the 3D accelerated package, you will also need AbstractGPU by Ronie Salgado, available (here). Ronie is the author of a number of terrific 3D development tools, including Woden (here) and Sysmel (here). Be sure to explore these excellent resources as well!
Have a great time with Smalltalk and keep on Squeaking!